Sunday, November 8, 2009
Willow? Why Bother?
Recently an old college roommate, who also live in Seattle, mentioned he'd taken down one of my favorite trees in his backyard -- a very old curly willow. He'd remembered I had admired its gnarly features and wondered if I'd like a piece.
So, I went over with the kids in tow and had a look. The trunk was in pretty bad shape, but I thought why not?
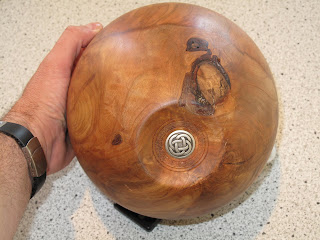
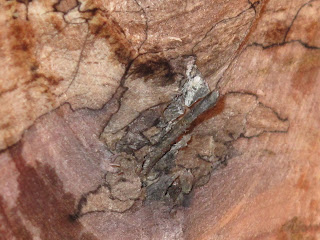
As you can see, the piece I ended up with was about rotten all the way through. So punky, it took over an hour to rough it out. (The fact that this is a very soft wood and pretty difficult to keep straight in a chuck in the first place didn't help much either...)
So back to the original question: Why bother?
For a couple of reasons. First, I wonder how far a a piece of wood can be gone and you're still able to work with it. Second, there's no better teacher than experience, so go for it, and see what happens. Third, this is a piece from a friend, from a tree that has memories attached to it; maybe I can return it, along with some if it's memories. (For example, see that black hole? That's where he'd sunk a metal screw into the tree to hold a swing for his kids.
As for the wood itself, Willow is very soft. The first time it's dropped, a dent will appear. But, there's beauty in the grain; as with all woods. And I aim to find it.
If I do manage to pull a bowl from this piece, it's most likely won't last very long. Then again, what does?
Thursday, September 24, 2009
Still One of My Favorite Things.
Much to my wife's chagrin, this piece is from a cherry trunk I lugged all the way from Georgia. (Actually, we had the moving guys do all the lugging, and the subsequent charging...)
A neighbor had taken down a beautiful old tree in their yard and a five foot section was laying out by the curb one day. I couldn't pass it up. It was warped, and twisted, and gnarled like crazy.
Several pieces emerged from the wood; this one being my instant favorite.
I like the delicate touch on the rim and the coloring towards the bottom.
And as always, a pewter button on the bottom for a signature finished it off well.
I was surprised the bottom held together so well when I was turning it; there was an inclusion a good four inches into the wood. This was also one of my first attempts at filling an inclusion with CA glue, solid. Not bad at all.
It measures about 6.5" tall, and about 8" wide.
Thursday, August 27, 2009
And Sometimes, This Happens.
I'm finishing off the last piece of cherry, and the last big round checked too far on me before I could get to it. So, I decided to rough out some smaller pieces.
Should have planned better in my cutting. As you can see, the place I chose for the foot had already started to spalt. Which, as you can imagine, makes it a bit mushy. (Or, maybe you can't see - look to the dark reddish spot at the bottom of the vessel.)
I was liking the shape, (got a little too aggressive), when I had a catch. And... lopsided she goes.
You can see where the foot disintegrated. I suppose I could have figured out a way to turn it back around and re-cut another foot; making a shallower piece. But instead, I chose to learn what I could from this piece and move on.
It's hard to see, but at the bottom, center of this shot, you can also see a crack going down an inch into the vessel. That came from the pith of the wood I chose. Had I inspected the wood better before settling on the foot I'd carved, I would have caught this and made the foot deeper in.
And a constant reminder from my father came back to me as I was looking at this - "Slow down, Terry. Slow down."
Wednesday, August 26, 2009
Sometimes, that's all you get.
I've been wanting to play with some of the indigenous West Coast trees since we got out to Seattle. And, things being things, it's taken me a while.
I finally got my hands on some Madrona. It's a pretty tree known for its peeling bark and red skin. It's also one of the hardest woods I've ever had the pleasure to meet.
I got one piece roughed out, then got distracted and set my sites on some big cherry rounds before they cracked.
By the time I got back to it, just a few weeks later, it had checked a good two inches from the bark. But, I thought I might be able to salvage something, so I started turning.
An hour later, I realized there wasn't much left to work with that wasn't damaged. So, I decided to scrap it.
Was it a waste of time? Nope. I learned some more about Madrona. I got to spend time on the lathe. And I used the time to experiment with the bevels on a few different gouges.
Which just goes to prove, even if you don't end up with something purdy after all that hard work, you will end up with more knowledge. And that's not a bad way to spend an afternoon in my book.
Saturday, August 15, 2009
As We Go.
A big part of making bowls is having wood to work with. Since I don't do a lot of green turning, I like the wood's moisture to be around 16% before I finish off a piece. That means rough out a bunch of things to about one inch thick. Pack 'em in shavings, or wrap 'em in newspaper. And wait. For about a year. (That's about how long wood dries - about an inch a year.
A few weeks ago I was driving Faedon back from swim class and saw a pile of cherry rounds sitting by the side of the road. So, I left a note.
A week later, I got a call for my new pal, Jim. "Come and get 'em." he said. "All I want in return is a bowl and some shavings." He smokes fish and other meats, and likes the cherry flavor.
So, while Ash and the kids were at the pool up the street, I ran over and collected them. Two trips later, I had five, 80lb. rounds; all about 18 inches across and just starting to check on one end.
As I worked, I piled the roughs under the lathe in the shavings; averaging about one bowl a session. (I've got kids and family obligations after all, that need attending to.)
When I'm finished, I'll have 8 great-sized bowls in the waiting. All between 11 and 15 inches.
As well as one very cool vessel, standing about 16 inches tall. Just look at the "X" grain pattern on the tall one there. Now let's hope nothing cracks.
Thursday, August 6, 2009
Click, Click, Click...
I dragged home a beautiful piece of spalted (maple?) the other day and finally got it on the lathe. It was really slow going because half of the wood is rotting and therefore less dense and lighter -- which means it'll never spin without wobbling, so you have to keep the speed way down. I didn't know just how far gone the wood was until I got into to.
I also didn't know what else I'd find. If I was paying attention, I would have noticed the tell-tale black area emerging as I took off more and more wood: leaking iron deposits.
But it wasn't until I heard that familiar click, telling me I had hit a nail.
Nice.
So, you stop and drill around it; making sure not to tug too hard on it, lest you loosen the chuck's grip on the bowl. Otherwise, you gotta take more wood off to get the dang thing back in round. I got this nail out in about 15 minutes.
And no sooner had I, when -- click, click, click...
By the time I had roughed out this shallow bowl, I had a whole assortment of shrapnel.
What started out as a quick half hour on the lathe turned into four and a half hours. I wrapped the emerging bowl in a plastic garbage bag between sessions so it wouldn't crack on the lathe.
When I finished roughing it out, I'd found a lot more damage to the wood than I had expected. And it's such a pretty piece, I decided to experiment on it and see if I could bring it back from the dead.
In the past, I usually soaked punky wood in a 4:1 solution of water and your basic 'white' glue. The finish is pretty dull though in the end, so I did a search online to see what others were trying.
I found a fella called The Rot Doctor not to far away. And what does he specialize in? Epoxy for damaged wooden ships. He's perfected an epoxy solution that penetrates rotting wood and within a few days, the resin sets up inside the grain making it as hard as new.
So, after this piece gets to about 20 percent water, I'll soak it for an hour. Until then, it's wrapped up in newspaper on a shelf in the basement. Waiting.
Sunday, July 26, 2009
The Things You Learn.
I'm reading David Ellsworth's, "Woodturning" as a way back in after a long hiatus, what with having the kids, building a house, and moving across the country over the past few years.
Here's a few things I didn't know. First, seasoned turners like spalted wood because it won't distort that much. As it spalts, (or begins to rot) much of the tension is removed so it won't move on you.
Second, spalted wood is wicked hard on sharpened tool edges. Because it's not wood any more; it's now a carbonized, iron-based composition.
Third, no one knows for sure if working with the spores is dangerous to your lungs. It's still up in the air, so err on the side of caution.
And fourth, you can start any piece spalting (like, say, if you wanted to design around a patch, for instance) by taping a few spalted shavings to the area you want to change, and wrapping it in plastic. Obviously, you have to wait a bit then, for Nature to do her thing.
And all this time I thought people liked turning it for it's outstanding design patterns. The things you learn. Thanks, David.
Friday, July 24, 2009
A Lesson In Thin.
Usually, I keep the walls of my bowls at about 3/8s of an inch. It seems to be the most visually appealing to me now. But there's another reason: it's a lot more forgiving the thicker you turn, in keeping a gentle curve. More, things are less likely to start moving if you stay thick.
This is a piece of Ash that had two large cracks running down the center. For fun, I repaired the cracks and started into it, and decided to try a thinner bowl; much like my favorite pasta bowl I use in the kitchen.
I was amazed the bowl moved out of round before I even turned it over to hollow it out. By easily a quarter inch. (I'm also experimenting with placing objects in the pictures to help you gauge the size of the things I'm working on.)
This is the first thing I turned bigger than 12" round. Other than that one piece that exploded in my face, requiring several stitches. But that's a story for another day. I need to make a jig so I can finish off this bowl. Currently, the jaws I have are too small. Stay tuned to see how that turns out.
There's Gold In There.
Last week I finally found a wood source. I'd love to tell you all about it, but as any turner knows, places to get wood aren't as easy to come by as you might think. Especially in a city where no one really plants trees that'll grow over 20' any more.
The place I stumbled upon has piles of off-cuts and the fella who owns the lot said I could take whatever I wanted -- as long as it was from the scrap pile. So, armed with a chainsaw and a tape measure, I began climbing all over the piles, dragging out things I thought might have an interesting grain hiding inside.
I'm not absolutely sure, but I think this is a piece of elm. It was a thin piece with lots of new growth, and a big burl sticking out of the bark.
Some cracks I glued to keep them from spreading, some I left alone.
Mostly, as I got into it, I thought the coloring was incredible. (Just think, this was in the trash heap.)
From the top, it's beautifully split in two.
From the bottom, it takes on a whole different look. This bowl's 11' by 3.5" deep, and finished with tung oil.
I was thinking I'd give this one away for a wedding present, so I chose this button for the bottom. Who knows, maybe it'll be the start of my Wedding Bowls Collection.
And if you look carefully, you can see the lip is beginning to heave after only two days. Now, we wait and see how far this things moves. Will it crack? Will it split where it's heaving. Dunno. Time will tell.
Two Years In the Making.
A few years ago while on a visit to New Jersey, I came across a cherry tree that had fallen on my wife's new mother in-law's farm. And I thought I'd like to prove it existed some how, so I asked Ashton's dad to ship a piece to me in Seattle.
When it came, I immediately roughed it out and set it aside; every so often, checking to see if it had cracked and repacking it in newspaper. When the wood reached about 16% moisture, I decided to throw it on the lathe and see what happened.
I was more than pleasantly surprised to see this bowl emerge.
It's about 11" wide and just over 7.5" deep.
I carved the outside and placed a pewter button at the base. Which, by the way, is my signature of sorts. I think it's a lot prettier than my name scrawled in the wood.
July 24, 2009
After hemming and hawing for quite some time, (actually, I don't really know what it means to literally hem and haw, but I do love the sound of the implied action...) I'm starting to chronicle my journey with my lathe with this blog.
Since most of the stuff I make is given away or sold, this felt like a nice place to keep track of it all. As well as, keep pace with my progress as I learn the tricks of what used to be a fascinating trade.
So if you're interested, read along. I'd love the company.
Since most of the stuff I make is given away or sold, this felt like a nice place to keep track of it all. As well as, keep pace with my progress as I learn the tricks of what used to be a fascinating trade.
So if you're interested, read along. I'd love the company.
Subscribe to:
Posts (Atom)